
Install Christmas Lights Like a Pro with Bulk, Empty Socket Light Line

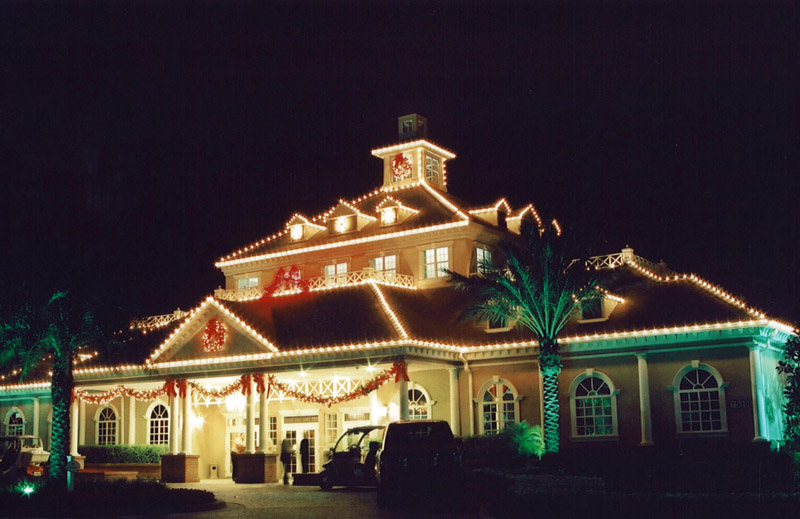
We've all see the businesses and homes that are outlined with absolutely perfect perimeter lighting. Every bulb is exactly in line with the next bulb and every dormer, ridge row, and architectural structure is cleanly outlined with no extra cord or bulbs hanging off the end. When done correctly, perimeter lighting can take an ordinary lighting project and turn it into a work of art. It's obvious, looking at projects such as the one pictured above, that this type of high-end lighting can only be achieved by professionally trained installers, right? Actually, no, anyone can achieve this same high-end look with just a little bit of planning and using the right materials. If you've ever stood on a ladder to paint, then you already have all the skills you need to install perimeter lighting like a professional.
Choosing the Correct Empty Socket Light Line
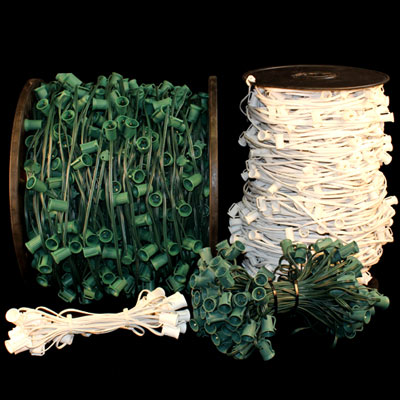
When it comes to installing perimeter lighting like a pro, the #1 rule is to buy the correct type of cord. This is where most people go wrong. They go to their local hardware or big box retail store, buy several boxes of pre-made C7 or C9 stringer sets and then attempt to install this around the perimeter of their home. The problem with this type of cord is that it generally comes in 25 or 50-foot sections with the plugs molded onto the cord and the bulbs already inserted into the sockets. With this pre-molded cord, when you get to the end of a run, you are stuck with trying to figure out what to do with the leftover cord. This is why professional installers never use stringer sets for perimeter lighting. Instead, they use either C7 or C9 bulk light line.
Bulk light line, also called empty socket light line can be purchased by the foot or in 500' or 1,000' spools. When using this type of cord, you simply measure out how much you need, cut the cord, screw in the bulbs, and then add a slide on the male and female plug. There's no electrical experience needed and the plugs simply slide onto the cord.
Since you are able to cut the cord, you can now customize the cord length to the area you are working on. This prevents the age-old problem of having extra sockets and bulbs left over. We've all seen the houses with perimeter lighting where the homeowner took the leftover cord and bulbs and strung them from the edge of the house, down to some bushes, and tried to hide them in the foliage. With the bulk light line, this is no longer a problem. Simply cut the cord and add your male to one end and your female to another.
When it comes to choosing your light line, you have a variety of options available. These include the socket base size (C7 or C9), a gauge of the cord, the color of the cord, and the spacing between sockets. Let's take a quick look at each of these.
Cord Socket Size - When it comes to the socket base size, you can choose between C7 or C9. For most structural perimeter lighting, C9s are the most commonly used. If lighting displays or small structures, then C7s work well.
SPT-1 or SPT-2 - SPT-1 or 2 refers to the thickness of the insulation on the cord. SPT-2 has thicker insulation than SPT-1. If you are installing the light line only for the holiday season, we recommend SPT-1. If you are looking to leave your cord up for more than 3 months at a time, then the extra thickness of the insulation on SPT-2 might be a good choice, however, if you plan on keeping the light line up on a year-round basis, then it's recommended that you invest in a heavier weight cord with nylon sockets. This type of cord is designed to hold up better for long-term use.
Color of the Cord - The most popular cord color is white or green. At times you may come across brown or black, but these colors are hard to find and tend to be more expensive due to the limited production runs at the factories. Typically, green accounts for about 70% of our cord sales and white the remaining 30%.
Socket Spacing - Spacing between sockets can range from 4" all the way up to 36". The most common spacing is 12" with 9" or 6" frequently being used on small structures with more details that need to be outlined.
Choosing the Correct Bulbs
Once you've decided on the type of cord, it's time to select the bulbs. The first question you'll need to answer is whether to go with incandescent bulbs or LEDs. LEDs have definitely gone mainstream and we sell significantly more LEDs these days than incandescent. Despite the fact that they cost 5 or 6 times more, most Christmas enthusiasts and virtually all commercial customers we work with exclusively use LED retrofit bulbs. Between the power savings, the long bulb life, and the illumination intensity, LEDs are unbeatable.
While we are big fans of LED retrofit bulbs, we have heard numerous horror stories where people have spent hundreds or even thousands of dollars on LED bulbs, only to get burned due to high failure rates and poor illumination intensity. We recommend sticking to either Minleon USA LED retrofit bulbs or Christmas USA LED retrofit bulbs. These are the only two manufacturers we use for our own installation jobs and haven't found any other bulbs on the market that hold up as well as bulbs from these two high-quality manufacturers.
Despite the advantages of LED retrofit bulbs, you may have to settle for incandescent bulbs due to budget constraints. There's a big price difference between LED and incandescent bulbs and sometimes there's just not enough money to make the investment into LEDs. The good news with incandescent bulbs is that because they do not contain any of the complex electronics that LEDs do, there's not much of a difference in the bulbs from one manufacturer to another. So for incandescent bulbs, it's not necessary to pay more in order to get a decent quality bulb.
Choosing the Correct Clips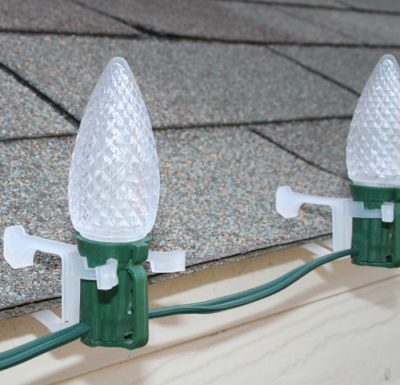

When it comes to the perimeter light line, the completed project is only as good as the clips you use. Picking the wrong clips, or going with a low-cost retail grade clip can quickly ruin all your hard work. Nothing looks better than clean, straight perimeter light lines.
In order to achieve a professional look using light line, there are a few things to keep in mind:
- Only use commercial-grade clips.
- One clip per socket, regardless of how close the spacing between sockets.
- Use the correct clip for the type of structure you are attaching the empty socket light line to.
Not sure which clip to use? Take a look at our Guide to Light Hanging Clips - Attachment Clips and Hardware.
Electrical
When it comes to using bulk, empty socket light line, the electrical is very straight forward. All you need is a male slide on the plug on one end of your run and a female on the other end. Once your male and female are on the cord, you simply plug it into a regular extension cord and you're good to go. When it comes to choosing the proper males and females, you'll want to make sure they match the specs on the light line. For example, if you are using the SPT-1 cord, which is the most commonly used, you'll want to use SPT-1 males and females. For the SPT-2 cord, be sure the plugs are SPT-2. The great thing about slides on plugs is they are very easy and require no electrical experience. For a brief step by step guide to installing these plugs, see our blog listing for Installing a Slide-On Plug.
When it comes to how many bulbs you can run on a single line, we recommend no more than 300 bulbs. For most applications, you'll be well under this number, but if you are doing long runs, then be sure that you do not put more than 300 bulbs on a single cord.
Putting it All Together
Once you've got the cord, bulbs, clips, and plugs, you're ready to go. Most people that decide to use professional-grade C7 or C9 light lines are amazed at how easy it actually is and how much better it looks than the traditional C9 stringer sets. The first year's installation will take a little longer, but once you've got all the cord cut, bulbs inserted, and plug installed, the year after year installations are a breeze. You'll no doubt be the envy of your neighborhood.
- Articles
- Ask Jason
- Christmas Lights
- Christmas Lights and Décor
- Christmas Time
- Christmas Traditions
- Christmas Trees
- Commercial Christmas Decorations
- Commercial Decorations
- Company News
- Decorative Lighting
- DIY Projects
- Light Installation
- Lighting Electrical
- Professional Christmas Installers
- RGB Christmas Lights
- Twinkly Smart Lighting


