

Tips for Taking Down and Storing Christmas Lights
Another holiday season has come to its inevitable close. And with its close comes the time for taking down and storing Christmas lights (it’s also time to start counting the days until next Christmas!). We think about how fun it’d be to always keep the lights up, but Christmas lights aren’t meant to be left on your plants, roofline or ground perimeter the entire year. Additionally, some areas in the US have local ordinances and laws that regulate the timeline for keeping outdoor lights up.
Taking down and storing Christmas lights might sound easy enough. But here’s something you probably haven’t considered: how you take down your lights is just as important as how you put them up. Careful take-down and mindful storage will set you up for success before your next holiday season. And read through to the end to discover other uses for your Christmas lights during the year.
 Removing Your Christmas Lights
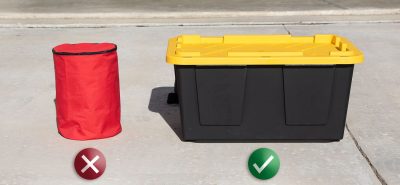
The first thing to consider when you take down your lights is the container you’ll store them in. For your outdoor Christmas lights, you’ll want to stay away from storage solutions sold by big box stores, which include spoolers and specialty containers. These solutions can seem creative or even innovative, but they're a waste of money—and not how pros store their lights. Either a plastic bin or cardboard box are perfectly fine for storing Christmas lights.
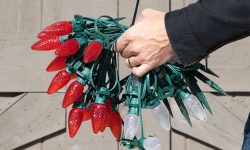
 From trunk wraps to scatter lighting, the technique for removing lights is the same. Remember: if Christmas lights get damaged, it’s usually during take-down. So steady your hands and fight the urge (hopefully not the habit) to rip your lights right off.
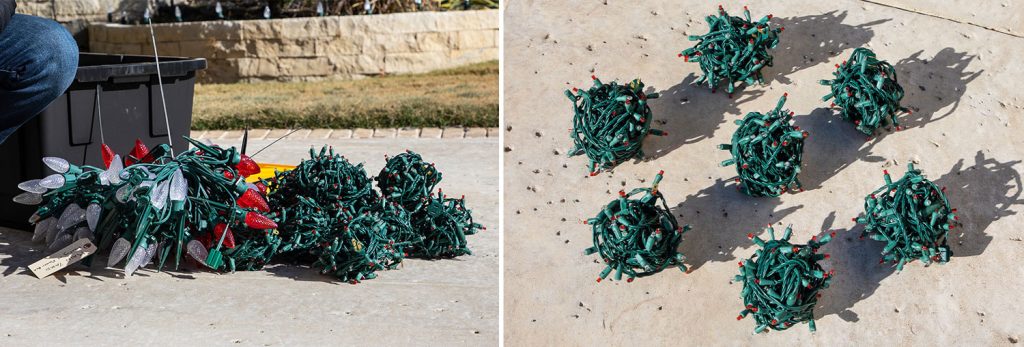
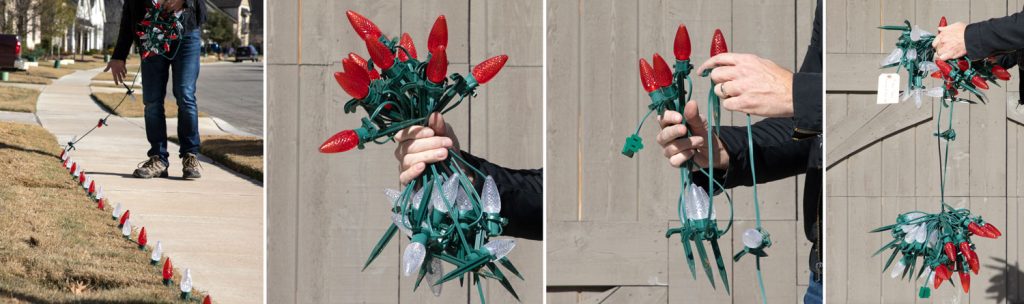
Remove lights by sets, making sure to unplug each set from each other. Leaving your sets plugged into one another can lead to a big mess of tangled string. Keep the take-down and storage of mini Christmas lights manageable by sticking to what the pros use: 5mm conical light sets between 50 to 100 bulbs.
As you unplug each set of Christmas lights, get into the habit of marking their ages. All older Christmas lights are eventually prone to failure. Track the age of your Christmas lights so that you know which are the freshest for displaying proudly, which are older for arranging to the background, and the oldest that are due for replacement. You can effectively indicate the age of any set by attaching a color-coded 4” zip tie to the line Use a color-coding system that indicates each year (i.e., black for first year, yellow for second year, etc.)
Balling your Christmas lights
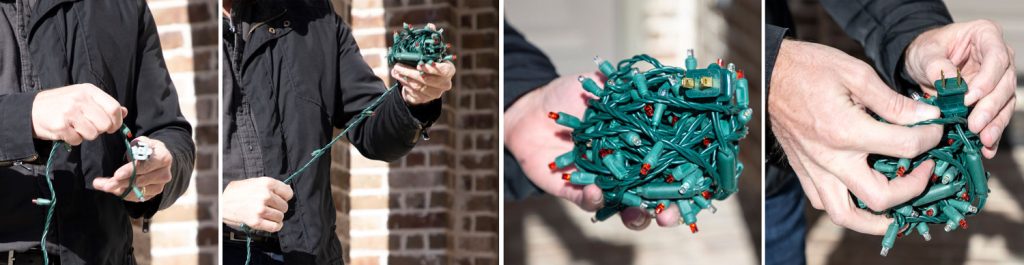
For 5mm conical lights, T5 lights, M5 lights, and C6 lights, we suggest balling up your light strings as pro installers do. Start at the end of your Christmas lights with the female plug and carefully pull the light string off toward you. Form a loop with your fingers and begin wrapping the light string into a ball. Keep the light string gathered in one hand and continue to draw the rest with your other hand, adding to your gathered ball of light string as you proceed. Leaving your male plug exposed at the end is important because this will leave it accessible for testing next year.
After you remove each set, avoid placing your sets on top of one another. This will keep your sets less like tangled spaghetti and more prepared for winding up after all sets have been taken down.
Taking Down Your Perimeter lights
Got ground perimeter or building perimeter lighting? Or both? The technique you’ll use for this part of take-down is the same.
The best way to start is by labeling the line and where it begins to ensure the male plug is in the right location. Light line is usually cut to fit the exact length of its application, so labeling each section of your light line in reference to your yard will give a clear idea of what goes where. This important step will help you remember where each strand fits in your yard, preparing your lights for next year’s installation. When it comes to roofline lighting, your light run covers specific areas, such as the gutter line, ridge line, and edge of the gables—each of which is known as a rake.
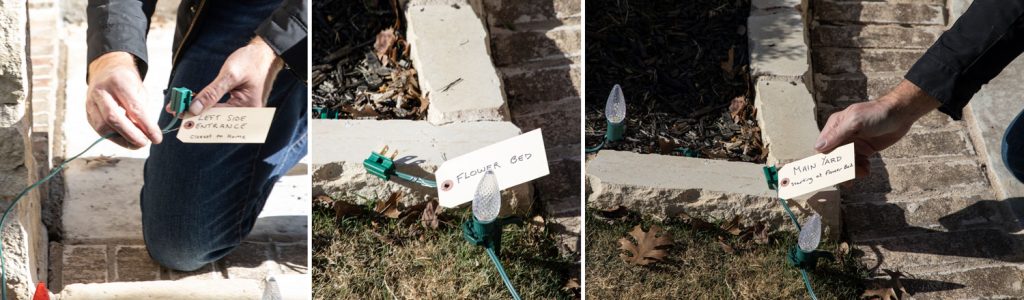 With staked ground lighting, we recommend leaving the stake attached if possible. For roofline perimeter lighting with clips, the right course of action depends on the type of clip. Clips that are easy to remove are best detached from your lights. Clips that lock into the base of the bulb can be left attached to the lights.
Winding and Wrapping Your Christmas Lights
Wind your lights to keep storage neat and tidy, and your light sets organized. Always start with the female plug to wrap around from. Leave the male end on the outside so that you can easily test your lights out. Hold the female end between your thumb and the base of your index finger, and then wind the Christmas lights string around your fingers. As you bring a few lines together, slip the string from your fingers and continue winding the lights up. Keep the light cord straightened out during winding to prevent any twisting. Once you reach the male end of the light string, finish the winding by tucking the male end underneath some of the wiring to lock it in place.
For Christmas light line runs with larger bulbs, such as C7 or C9 lights, gather the line up and hold each bulb beside one another, skipping every other bulb. Put any clips or stakes that fall off during this part into your storage bin. As your bundle of bulbs gets too bulky to handle, skip one or two bulbs and start another bundle. Zip tie each bundle along the way to keep them from coming undone.
 Tips for Storage
Some care in your storage will help you maintain your lights and make prep for the next decorating season a breeze.
We know that the weather, well…happens. So it’s not uncommon for lights to get an amount of rain, snow, or ice on them. But moisture and Christmas lights don’t make the best of friends. And for good reason. The ground-fault circuit interrupter (GFCI) in a home can be tripped when the weather gets particularly wet. This cuts off the power supply to any sections of outdoor lights. GFCIs are a great safety measure to protect from electrocutions, but they can also be a bit unpredictable when the elements are in play. Even some moisture can trip the power, snuffing out the shine of a whole lighting display. Prevent any moisture build-up by making sure your lights are completely dry before storing them.
Store your lights in either the house or garage. But avoid one place—the attic. Heat rises, and it goes up the attic. This leads to high temperatures that reduce the lifespan of Christmas lights, which makes the attic an inhospitable place for your sets. Instead, keep your lights where you can easily reach them—because your lights can be used to brighten things up around your home year-round! Decorate your patio with lights to cast a warm glow over those summer barbecues, or put lights in your kitchen to create a more captivating cooking space. Find out more about how to get the most out of your lights here and here.
The tips and techniques you’ve learned here will have you taking down and storing your Christmas lights like a pro. If you need more support with your take-down and storage process, though, we’ve got you covered. Drop us a line at [email protected] or give us a call at 1-800-391-5280. We’re happy to help you wrap up your take-down and storage as neat as a Christmas bow.
- Articles
- Ask Jason
- Christmas Lights
- Christmas Lights and Décor
- Christmas Time
- Christmas Traditions
- Christmas Trees
- Commercial Christmas Decorations
- Commercial Decorations
- Company News
- Decorative Lighting
- DIY Projects
- Light Installation
- Lighting Electrical
- Professional Christmas Installers
- RGB Christmas Lights
- Twinkly Smart Lighting

