How to Light the Perimeter Of Your Home and Roofline with Christmas Lights

Roofline Christmas lights stand literally above the rest of other forms of Christmas lighting. Roofline lighting crowns your house with the beauty of a thoughtful Christmas display that shines brightly in your neighborhood, helping to share the cheer that makes Christmas the best time of year.
You too can share the enchanting spirit of the holiday season by lighting the perimeter and roofline of your home. We’re here to guide you on how to create custom Christmas light runs with retrofit bulbs and socket line. Our expert advice in this article will have you putting up Christmas lights on your roofline like a pro.
 What are the Benefits of Roofline Lighting?
Gives Wonderful Curb Appeal
Roofline lighting is some of the most attractive decorating you can do to your house. Ever. It gives your house a proud glow, highlighting the aesthetic charm of your home’s architecture. Whenever you take a gander at your home, you can take pride in the radiant glow of your roofline Christmas lights.
Makes for a Rewarding Project
A good project around the house can be quite fulfilling. It can help you enjoy a sense of accomplishment while teaching you how to embrace the process. Part of the reward comes from manifesting a statement like, “I’ve got this.” And proving to yourself that you can pull off roofline lighting can give you the confidence to tackle even bigger projects in the future.
Shares the Christmas Spirit
Lastly, roofline lighting is a visible way to share the warm sincerity of the Christmas spirit. Something about Christmas has a direct line to the hearts of many. And roofline Christmas lights can put the magic of Christmas in the hearts of those who see and appreciate your display in the neighborhood. A high quality display adds a sense of wonder and grace into your community.
Along with the following information in this article, be sure to check out our how-to video to see the installation in action:
What You’ll Need to Hang Your Lights
Ladder
Safety first! Hanging Christmas lights on your roofline requires some climbing. So ensure you have a good quality ladder and that you’re familiar with how to use it. If you feel uncomfortable on a ladder, find someone with experience to help you out. Or, if working with a ladder is in no way your cup of tea, hire a professional installer.
Retrofit Bulbs
The best displays are made with the best lights. And for the best lights, professional grade LED Christmas lights are the only way to achieve the jaw-dropping results found in top notch displays. Stick with either Pro Christmas or Minleon C9 bulbs for your project. These are high quality brands that maintain a standard of excellence in color, luminosity and build.
 Christmas Designers is a trusted source of lights for several thousand professional Christmas lights installers every year, in addition to businesses and residential customers. We have C7 retrofit and C9 retrofit bulbs that are perfect for lighting your roofline.
Empty Socket Light Line
The foundation of your roofline lighting is the light line. Bulk light line provides a bevy of options to choose from in length and spacing between lights. For length, select from 100 to 1,000 feet of line. And for spacing, select from 4 inches to 36 inches between lights.
 We recommend 9 to 15 inches in spacing for roofline Christmas lights, depending on your budget. If you’re more frugal, 15 inches will help that budget stay in check. But if funds allow, you can nail a fantastic-looking display with 9 inch spacing.
Be sure to use empty socket light line and not stringer sets! Empty socket light line is best for perimeter roofline lighting, while stringer sets are made for foliage lighting best for trees, bushes, and similar outdoor plants.
Power
Your power cord is key to lighting up your display. Zip cord is great for getting the length of your extension cord just right. Then, add your plugs—known as vampire plugs or vampires for short. You’ll need both male and female vampires for your roofline Christmas lights. We also recommend a timer for controlling when your lights turn on and off. And lastly for your power, have a good extension cord ready.
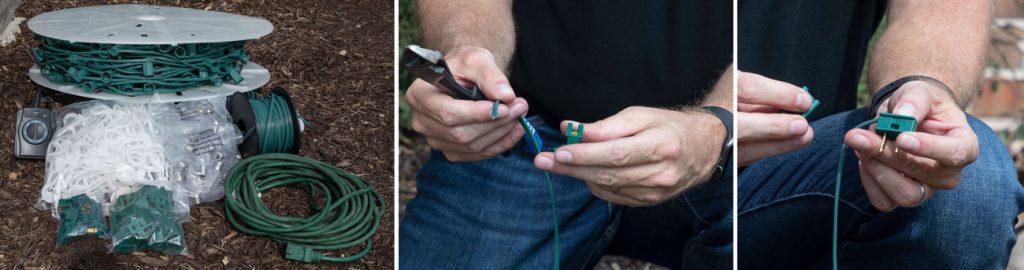
Clips
Using clips is the best way to light the lights along the perimeter of the roof. We like the the flex clip because its clip stays on the socket while the bulb locks it in place. This makes removal of your lights at the end of the season easier, as clips remain attached to the socket instead of the roof or falling all over the place.
Prep before installing
Now that you’ve got what you need, let’s take the first steps toward installing your roofline Christmas lights.
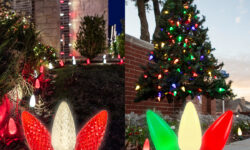
Grab a clip and slide it onto the end of a light socket. Then take a bulb and screw it into the socket. Repeat this process for all of the lights on your designated length of light line. The clips move around somewhat freely after screwing in the bulb, allowing for more flexibility during your install.
 After clipping up your lights, locate your power source. Remember this rule: a single line should never exceed 250 feet or 200 bulbs—whichever comes first. Going past either of these numbers when connected to an individual plug leads to substantially reduced voltage and dangerous heat build-up in the wire that may result in a fire hazard.
We recommend using the same outlet for all lights so that all lights are synchronized effectively. All lights will turn and off simultaneously, and they will also run on the same timer through a single power source.
Installing your Roofline Christmas Lights
You’re at the install stage! Place your lights by inserting each clip onto the edge of your house’s gutter. If your house doesn’t have a gutter, place the lights by inserting the clip between the shingles and the trim.
Work down the line from socket to socket. Maintain balance in placement: don’t pull the line between lights too tight, and don’t leave too much slack either. The nature of using clips leaves room for making adjustments where each light sits as you move along. That said, the position of each light that you place thankfully isn’t set in stone.
If your roofline transitions from gutters to shingles, you’ll need to change orientation from horizontal to vertical. But don’t stress about this adjustment: changes from horizontal to vertical bulb direction aren’t noticeable when the lights are lit up at night. You can hide slack in the line caused by the transition from gutters to shingles in the gutter.
Prominent shifts in roofline height can be tackled via one of three methods.
- Cut the line and use zip cord from the lower to the upper section.
- Note: introducing connection points creates a potential failure point.
- Cap the sockets of line in between using socket cap covers.
- This method works well, but it doesn’t look clean. Moisture may also enter the socket.
- Detach the socket using a mallet and wrap the open holes with electrical tape (preferred).
 As you reach a peak in your roofline, placing a bulb at the center of the peak will give a balanced appearance to the display. This will also accentuate the shape of your roofline. You may have to add some slack to the line as you approach the peak. If you’ve placed the bulb at the peak correctly, each side of the peak should show attractive symmetry and the line should settle nicely.
Lighting Your Entryway
If your home has an entryway arch connected to your roofline, lighting this area will pull the look of your roofline perimeter lighting together. Adorn your entryway with the same lights that you’ve placed on your roofline for a complete and refined look.
For this area, we recommend applying your lights using hot glue, which works well on brick, stone, and unpainted concrete. Please note: painted surfaces and stucco are susceptible to damage from hot glue, so double-check your surfaces before application. It's a very smart idea to perform a small patch test on your application area to make sure you don't sustain any surface damage. A hot glue gun is the key to application, and a cordless or corded gun will work fine either way.
 With the nozzle slightly away from the socket to prevent damage, apply a dab or two of hot glue to the bottom of the socket. Press the socket against the entryway arch and hold it there for several seconds so that the glue effectively sets up. Repeat this process for all lights along the arch of the entryway.
Let There Be Light!
All of your lights are installed. Now it’s time to connect the power. Start by setting up the first male power plug.
Separate the line with diagonal cutters and then locate the wire with the ribbed side. The ribbed side always corresponds to the wider blade on the plug. Inside the plug, look for the pin and wide blade to identify where they sit. Insert the wire into the chamber that separates the two wires out. Fold the wire down against the plug, and slide the back onto the plug. If getting the back into place is giving you difficulty, use channel locks to help move and secure the back into position.
 Connect your male and female plugs where needed. For more complicated lighting installs, you may have to follow along with your lines to verify the correct sides. Keep in mind that an end of a run is where a female plug is placed.
To connect the entryway lighting to the roofline lights, you can use one of two types of female plugs. The first is a plug that’s found at the end of a run, effectively terminating the line. The second is an inline female plug that can be put anywhere in-line, to which a male can plug in and power up additional sections of lighting. The right type of female plug is determined based on where your entryway connects to your roofline. If your roofline is connected to your entryway somewhere in the middle of your entryway line, then using an inline plug will make the most sense.
 Finally, it’s time to get the power from the power source that you located during the prep phase. If you’re using a timer for your lights, simply plug it into the power source plug, and then connect the timer to beginning of your light line run with zip cord.
That’s a Wrap!
After your installation is all said and done, you might find it easier than anticipated. If you follow along closely with our directions, even your first go at installing roofline Christmas lights can look professional.
Questions? We’re here to help! Email or call us via the contact info below with any questions on lighting your roofline, or about other details on Christmas displays. Our experts are ready to offer advice on how you can make your home looks its best for the holiday season.
- Articles
- Ask Jason
- Christmas Lights
- Christmas Lights and Décor
- Christmas Time
- Christmas Traditions
- Christmas Trees
- Commercial Christmas Decorations
- Commercial Decorations
- Company News
- Decorative Lighting
- DIY Projects
- Light Installation
- Lighting Electrical
- Professional Christmas Installers
- RGB Christmas Lights
- Twinkly Smart Lighting

- FAQ
- When Do Cities Take Down Christmas Lights?
- What Can You Do with Leftover Christmas Decorations?
- What Can You Do with Leftover Christmas Decorations?
- When Should You Take Christmas Decorations Down?
- Are Commercial-Grade Christmas Lights Worth It?
- What Does “Commercial-Grade Christmas Lights” Mean?
- What is the Difference Between Retail Christmas Lights and Commercial Lights?
- How to Store Icicle Lights
- How Do You Hang Icicle Lights?
- Do LED Christmas Lights Use a Lot of Electricity?
- Are LED Christmas Lights Better for the Environment?
- Are LED Christmas Lights Shatterproof?
- How Much Do LED Christmas Lights Cost to Run?
- What Kind of Christmas Lights are Best for Outside?
- How Many LED Christmas Lights Can I String Together?
- Are LED Christmas Lights Cheaper to Run Than Incandescent Lights?
- Are LED Christmas Lights Safer?
- Are LED Christmas Lights Brighter?
- Can LED Christmas Lights Get Wet?
- Why Are My Christmas Lights Dim?
- Why Do Christmas Lights Stop Working?
- Test FAQ
- Do LED Christmas Lights Get Hot?
- Are LED Christmas Lights Worth the Extra Money?
- How Long Do LED Christmas Lights Last?
- Commercial Christmas Decorating, Sales & Consulting
- Commercial Christmas Garland
- Indoor & Outdoor Commercial Christmas Trees
- Light Pole Banners