How to Transform Your Pool Area with LED Christmas Lights as Landscape Lighting

When the weather gets warmer, the outdoors become inviting. And the most inviting area on a warm evening? The pool! But don’t let the sunset keep you from enjoying your pool. With some Christmas lighting magic upon your outdoor foliage nearby, your pool area will become a shining summer oasis that’s just as appealing in the dark as it is the day!
 Follow the steps in this tutorial and you’ll transform your pool area into the ultimate outdoor space. First, we’ll cover what you need before you begin, and then how to perform the install like a pro. Let’s dive in!


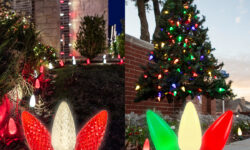
 Landscape lighting around your pool is on the long-term side of lighting installations, so zip ties are great for keeping lights up over time. Attach the line to the upper part of the tree using a zip tie. Cut the excess of the zip tie with your cutting pliers.
With the line attached near the top of the tree, bring the light line down toward the bottom of the tree, and back up again to create a U-shaped pattern. Repeat this pattern around the front and side of the tree.
Landscape lighting around your pool is on the long-term side of lighting installations, so zip ties are great for keeping lights up over time. Attach the line to the upper part of the tree using a zip tie. Cut the excess of the zip tie with your cutting pliers.
With the line attached near the top of the tree, bring the light line down toward the bottom of the tree, and back up again to create a U-shaped pattern. Repeat this pattern around the front and side of the tree.
 Terminate the end of your light line with a male vampire plug, and plug it into the female end of your zip cord. When working with empty socket light line, don’t use more than 250 feet of line, or 250 bulbs—whichever you reach first. A general rule is that the more line/bulbs in your arrangement, the more the amperage depletes.
Follow the steps in this tutorial and you’ll transform your pool area into the ultimate outdoor space. First, we’ll cover what you need before you begin, and then how to perform the install like a pro. Let’s dive in!
What are the Benefits of Custom Landscape Lighting Around Your Pool?
Brightens the Area
Any outdoor space can get dark come nighttime. But LED Christmas lights can brighten your pool area so that it’s usable well after the sun has called it a day. The G50 LED retrofit bulbs that we recommend are brighter than Christmas lights in other categories, so your pool will have ample light.Adds Charming Appeal
Regular outdoor lights are one thing. But Christmas lighting has a special glow that adds a magical ambiance to any place they light up. The space around your pool will undoubtedly look different, and it will feel different as well thanks to the unique charm that Christmas lights offer as custom landscape lighting. What You’ll Need to For Your Install
Setting
Before you even begin to consider your supplies, first assess your space. For this project, the lights will need foliage to be installed on. This means your pool area should have trees around it, although it doesn’t need to be surrounded. Bushes, hedges, and shrubbery can also be decorated with lights, but be sure that this foliage is sturdy enough to support the weight of a light strand. Overall, your decorating can be considered a success when you’re able to truly enjoy the effect of having attractive pool lighting.Materials
The recipe for a smooth install calls for the right ingredients. Here’s a list of carefully selected ingredients that we recommend:
G50 SMD Retrofit Bulbs
With a medium base, G50 lights are brighter than other traditionally sized bulbs because of the 10 LEDS contained in each bulb. The faceted design to the bulb’s surface brings out sparkle and shine that’s sure to catch the eye. For this project, you'll want to stick to the G50 bulbs with a C9 (or E17) base so they're compatible with empty socket light line.C9 Empty Socket Light Line, 24” Spacing
Even if you aren’t a pro, empty socket light line is key to an install that looks professional grade for two major reasons: you can insert top quality bulbs into the sockets on the line, and you can use as much as or little line as you need. C9 empty socket light line with 24 inches of space between sockets allows for robust amperage and room for each light to shine.
Light Timer
The easiest way to use your lights is with a dedicated light timer, and this is especially true for landscape lighting. The timer you choose will determine what activates your lights. A photocell timer will activate your lights right when it starts to get dark outside. A timer that works through a Wifi smart app will allow you to control your light activation with more precision.5mm Conical Angle Light Sets
They may be small, but they still dazzle! These top selling lights are a nice size and weight for greenery such as bushes, hedges, and shrubbery. They’re also convenient, featuring an all-in-one design that makes them easier to set up and take down than other pro grade lights.Other Materials:
- 18/2 male and female vampire plugs
- Socket cap covers
- Extension cord
- 18/2 zip cord
- Zip ties
- Cutting pliers
- Light timer
- Rubber mallet (optional)
Hang LED Christmas Lights on Trees & Greenery
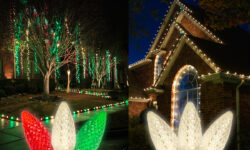
With your materials at the ready, you’re on your way to putting the lights up. Focus on lighting only the sides of the trees and greenery that face your house and pool. This maximizes the use of your available lights, and helps make the install more cost-effective because it limits the number of lights needed. Before you begin, we recommend putting a female vampire plug on the end of the line that you’ll be starting your light wrap with—even if you don’t plan to use that plug. A female plug will terminate the open wire.Landscape lighting around your pool is on the long-term side of lighting installations, so zip ties are great for keeping lights up over time. Attach the line to the upper part of the tree using a zip tie. Cut the excess of the zip tie with your cutting pliers.
With the line attached near the top of the tree, bring the light line down toward the bottom of the tree, and back up again to create a U-shaped pattern. Repeat this pattern around the front and side of the tree.
Bulb Up Your Light Line
With your light line in place, it’s time to bulb up the sockets. If any sockets aren’t facing toward your house or pool, skip the bulb for that socket. Instead, snap on socket cap covers to keep the sockets from collecting dirt, water, or anything else that doesn’t belong in a lighting socket. Or for a cleaner look to your light line, you can knock off un-bulbed sockets with a rubber mallet and use electrical tape to seal the holes. As you work along the line, add zip ties to strengthen the line’s attachment to the tree. Keep the spacing between zip ties generous.Terminate the end of your light line with a male vampire plug, and plug it into the female end of your zip cord. When working with empty socket light line, don’t use more than 250 feet of line, or 250 bulbs—whichever you reach first. A general rule is that the more line/bulbs in your arrangement, the more the amperage depletes.
Connect Your Line to the Next
Proceed to the next tree with a fresh set of empty socket light line, and decorate using the same U-shaped pattern. Whether your trees are bushy or wispy, thick or thin, the U-shaped pattern applies to all. And remember to keep fastening zip ties to parts of the line for a more secure installation. As you navigate the light line around the branches of your trees, customize and adjust the position of the sockets so that they face your pool or house. If any socket is facing at an angle that’s too out of sorts, cap or break off with a mallet as necessary.Installation Video:
Drumroll, Please…
Your trees and foliage are now decked out with line and bulbs, so it’s time to test your landscape lighting handiwork. Plug the last line of the chain into your extension cord, then to your timer, then to your power source—and voila! Your lights should all be on, brimming with the pretty tone that only LED Christmas lights can produce. Transforming your pool area with LED Christmas lights as landscape lighting is a straightforward lighting project that will give the area around your pool a real glow up. On that note, are you looking for more ways to take your outdoor space to the next level? Or do you have a special project in mind? Wherever you want to take your lighting and decorating, we can help you get there. Reach out via email through [email protected] or talk to us on the phone at 1-800-391-5280. We’re always happy to hear from you!Search
Categories
- Articles
- Ask Jason
- Christmas Lights
- Christmas Lights and Décor
- Christmas Time
- Christmas Traditions
- Christmas Trees
- Commercial Christmas Decorations
- Commercial Decorations
- Company News
- Decorative Lighting
- DIY Projects
- Light Installation
- Lighting Electrical
- Professional Christmas Installers
- RGB Christmas Lights
- Twinkly Smart Lighting
Recent Posts

#1 Choice for Pros & Christmas Enthusiasts
Top Pages
- FAQ
- When Do Cities Take Down Christmas Lights?
- What Can You Do with Leftover Christmas Decorations?
- What Can You Do with Leftover Christmas Decorations?
- When Should You Take Christmas Decorations Down?
- Are Commercial-Grade Christmas Lights Worth It?
- What Does “Commercial-Grade Christmas Lights” Mean?
- What is the Difference Between Retail Christmas Lights and Commercial Lights?
- How to Store Icicle Lights
- How Do You Hang Icicle Lights?
- Do LED Christmas Lights Use a Lot of Electricity?
- Are LED Christmas Lights Better for the Environment?
- Are LED Christmas Lights Shatterproof?
- How Much Do LED Christmas Lights Cost to Run?
- What Kind of Christmas Lights are Best for Outside?
- How Many LED Christmas Lights Can I String Together?
- Are LED Christmas Lights Cheaper to Run Than Incandescent Lights?
- Are LED Christmas Lights Safer?
- Are LED Christmas Lights Brighter?
- Can LED Christmas Lights Get Wet?
- Why Are My Christmas Lights Dim?
- Why Do Christmas Lights Stop Working?
- Test FAQ
- Do LED Christmas Lights Get Hot?
- Are LED Christmas Lights Worth the Extra Money?
- How Long Do LED Christmas Lights Last?
- Commercial Christmas Decorating, Sales & Consulting
- Commercial Christmas Garland
- Indoor & Outdoor Commercial Christmas Trees
- Light Pole Banners