The Definitive, Step-by-Step Guide to Using C7 and C9 Bulk Light Line For Your Christmas Display
It doesn’t matter how serious or passionate you are about your Christmas light display; If you don’t work as the professionals do, your results simply won’t be able to compete. Luckily, top-tier Christmas design doesn’t require complex techniques or dozens of more hours of labor—it just requires using the right materials for the job.
If you’ve been wondering why professionally-installed displays outdo yours year after year, chances are that C9 bulk light line is the answer. Instead of buying cheap, readymade stringer light sets at a big-box store with the bulbs already molded to the cord, pro installers cut their cord to the exact specifications of the project at hand, then select and screw in the bulbs themselves. This eliminates the leftover light line at the end of runs and results in higher quality bulbs and a much cleaner, more attractive display overall.
Still, amateur installers sometimes balk at the idea of creating their own custom light line. To some, it sounds like a difficult, involved, and maybe even dangerous process. But in reality, using C7 or C9 bulk light line in your home Christmas display is so easy that any intrepid enthusiast can do it. Just follow this step-by-step guide and you’ll be installing like the pros in no time.
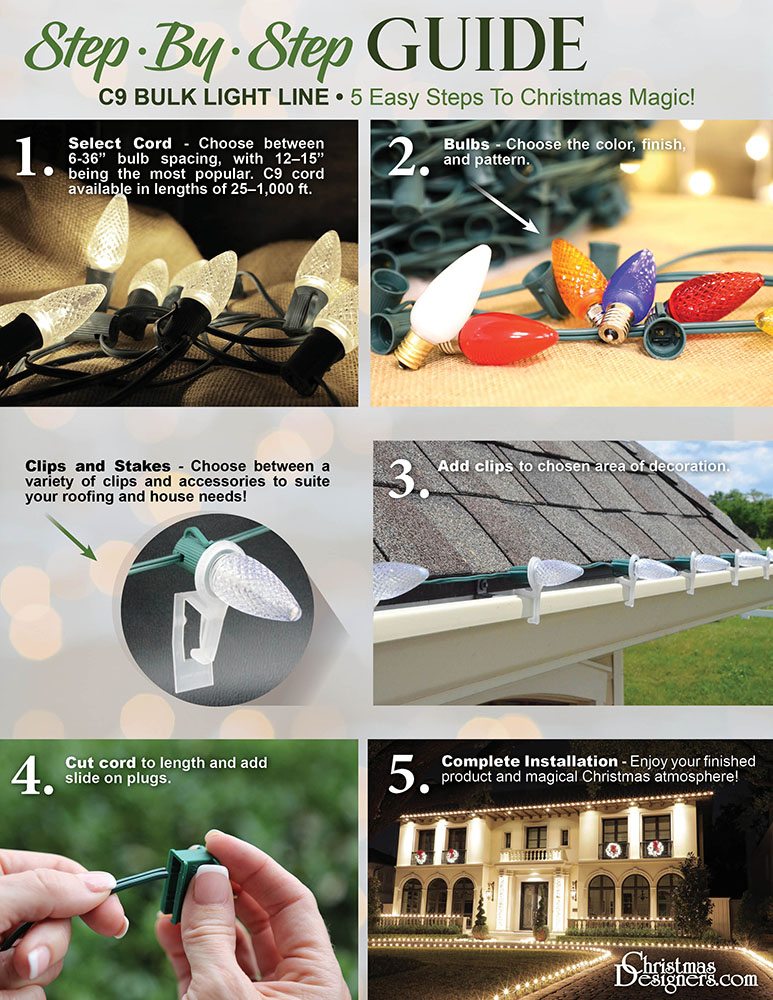
1. Buy the right bulk light line.
Bulk light line, also known as empty socket light line, is purchased in lengths ranging from 25' to 1,000' bulk spools. Other than the length of the cord, there are a few factors to consider:
Cord socket size: Bulk light line comes with sockets attached for either C7 or C9 bulbs. C9s are the most commonly used, the large ones most people picture when they think of a beautiful display, and for good reason. But the slightly smaller C7s can be perfect for lighting smaller structures or scattering in trees.
SPT-1 vs. SPT-2: The cord’s SPT rating refers to the thickness of its insulation. It’s easy to get caught up in the nitty-gritty of the subject, but all you really need to know is that SPT-2 is .015” thicker than SPT-1. We recommend using SPT-1 if you’re only keeping your lights up for the holiday season. If your cords will be exposed to the elements for more than four months at a time, it may be worth springing for the thicker cable.
Socket spacing: Spacing between bulb sockets ranges anywhere from 4” to 36”. 12” is the industry standard, though 9” or 6” is common when decorating small structures with a need for more minute detail.
Cord color: The most popular and affordable cord color is green, followed by white at a distant second place. Brown and black are also sometimes available, but will usually be more expensive and hard-to-find. It’s best not to overthink the color, just go with your preference and keep it consistent.
After you’ve chosen your cord, make sure you pick up the right vampire plugs to make your bulk light line actually usable. Match the plugs to the SPT rating of your cord, and you’re good to go.
2. Buy your bulbs.
Once your light line is squared away, you’ll need bulbs to screw into the empty sockets. One of the advantages of using the bulk light line is that since the bulbs don’t come pre-molded to the cord, you can choose whatever color bulbs you choose. With so much freedom, though, it can be a little bewildering to beginners.
Ultimately, the color of your bulbs will come down to personal preference. Most folks go with either the classic multicolored look or warm white bulbs for their displays, but if you want to stand out, you can opt for more exotic colors such as pink or purple.
The main thing you should worry about is the quality of the bulbs you’re buying. Before you drive to your nearest hardware store and pick up a batch of shoddy big-box lights—or low-quality lights masquerading as a “commercial” grade—it’s important to understand the differences between retail-grade and truly professional-grade LED Christmas lights. It's best to stick to the bulbs that professional Christmas installers use. The top choice for professionals is either Pro Christmas or Minleon brand bulbs. Anything else and you're leaving it up to chance. And you'll find that the price is only a few cents higher per bulb than their low-quality counterparts.
3. Measure and cut the cord.
Once you’ve got all the materials you need (don’t forget clips!) you’re ready to put it all together. But before you start cutting the cord and attaching vampire plugs, you need to know how many lines you’re going to need. Measure carefully along the edge of the roof, driveway, or walkway you’ll be lighting, making sure to include a slight bit of leeway so the plugs can reach their outlets. It doesn’t have to be to-the-millimeter exact, but the more precise you can be, the cleaner the presentation will look when you’re finished.
You'll want to make sure you aren't maxing out your cord. Keep in mind the 300/500 rule. Never run a single line more than 300 feet or 500 bulbs, whichever comes first. For 12" spacing, you're okay going up to 300 bulbs, which is 300 feet. But if you're using 15" spacing, then you'll want to stop after 240 bulbs, which is 300 feet. Going longer than 300 feet results in voltage drop and can cause problems with your light line. Also keep in mind that you can plug up to four, 300 foot runs into a single outlet. Just be sure you're using a 3-way adapter that is rated for 15 amps.
Once you’ve got your measurements, use wire cutters to cut your light line to size, and you’re ready for the next step.
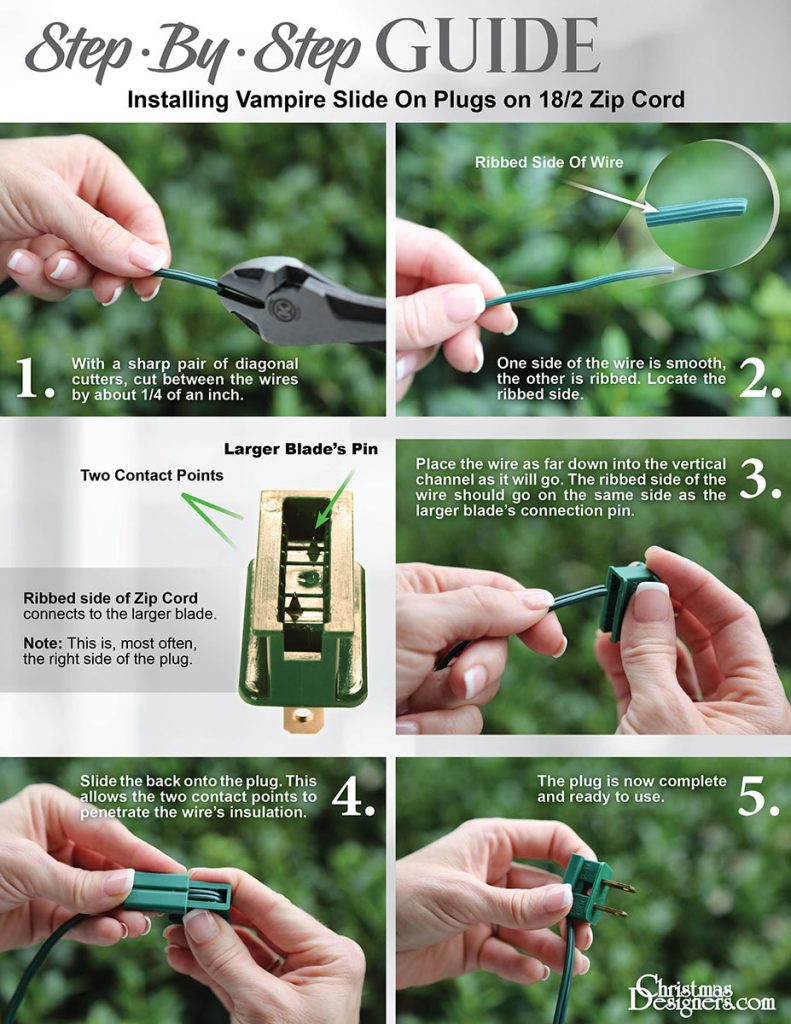
4. Attach a male and a female vampire plug to either end.
We’ve already put together an article detailing everything you need to know about vampire plugs, but for a quick breakdown, take a look at the guide below.
5. Screw in the bulbs.

This part is pretty self-explanatory, but just in case, it’s worth noting you want to do this before you clip the light line to your home. When screwing in bulbs, you can choose whatever color pattern you want, but be vigilant to keep it consistent. Many have been driven to the brink of insanity by a single misplaced colored light offsetting their perfect display.
6. Hang them up!
Now comes the labor-intensive part. Carefully attach your custom light lines to the perimeter using high-quality clips, making sure to use one clip per socket, regardless of how close the spacing is.
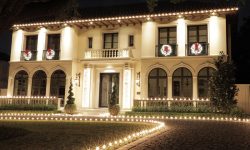
And then finally, you’re done! Once everything’s put together, you’ll be delighted by how much more vivid and crisp your display looks than years past, without a single annoying trailing light insight. The first time you use a bulk light line for your installation, it may take a few extra minutes, but once you experience the ease and brilliance of custom-length light lines, we’re guessing you’ll never go back. There’s a reason why professionals only use a bulk light line for perimeter lighting—the results speak for themselves!
- Articles
- Ask Jason
- Christmas Lights
- Christmas Lights and Décor
- Christmas Time
- Christmas Traditions
- Christmas Trees
- Commercial Christmas Decorations
- Commercial Decorations
- Company News
- Decorative Lighting
- DIY Projects
- Light Installation
- Lighting Electrical
- Professional Christmas Installers
- RGB Christmas Lights
- Twinkly Smart Lighting
- FAQ
- When Do Cities Take Down Christmas Lights?
- What Can You Do with Leftover Christmas Decorations?
- What Can You Do with Leftover Christmas Decorations?
- When Should You Take Christmas Decorations Down?
- Are Commercial-Grade Christmas Lights Worth It?
- What Does “Commercial-Grade Christmas Lights” Mean?
- What is the Difference Between Retail Christmas Lights and Commercial Lights?
- How to Store Icicle Lights
- How Do You Hang Icicle Lights?
- Do LED Christmas Lights Use a Lot of Electricity?
- Are LED Christmas Lights Better for the Environment?
- Are LED Christmas Lights Shatterproof?
- How Much Do LED Christmas Lights Cost to Run?
- What Kind of Christmas Lights are Best for Outside?
- How Many LED Christmas Lights Can I String Together?
- Are LED Christmas Lights Cheaper to Run Than Incandescent Lights?
- Are LED Christmas Lights Safer?
- Are LED Christmas Lights Brighter?
- Can LED Christmas Lights Get Wet?
- Why Are My Christmas Lights Dim?
- Why Do Christmas Lights Stop Working?
- Test FAQ
- Do LED Christmas Lights Get Hot?
- Are LED Christmas Lights Worth the Extra Money?
- How Long Do LED Christmas Lights Last?
- Commercial Christmas Decorating, Sales & Consulting
- Commercial Christmas Garland
- Indoor & Outdoor Commercial Christmas Trees
- Light Pole Banners